Showing posts with label Computer Tips. Show all posts

Tuesday, 19 April 2016

Computer RAM Boosting Methods

Delete unnecessary file from different location to Boost the speed of your computer:

a) %temp%
1. Type %temp% in the run dialogue box.
2. It will open a new window showing the long list of files called temporary internet file.
3. Select all files by Ctrl + A.
4. Delete them permanently from your system by Shift + Delete.
b) temp
1. Type temp in the run dialogue box.
2. It will open the list of files in the new window.
3. Select all the files in the folder.
4. Delete them permanently from your computer.
c) prefetch
1. Type prefetch in the run dialogue box.
2. Shows the list of files in the new window.
3. Select all and delete them all from your system.
All these steps will reduce the load on the RAM (Random Access Memory) of your computer and increase the speed of your computer. But guys you must do it daily or atleast once in a week to maintain and increase the speed of your computer.

Delete unnecessary file from different location to Boost the speed of your computer:

a) %temp%
1. Type %temp% in the run dialogue box.
2. It will open a new window showing the long list of files called temporary internet file.
3. Select all files by Ctrl + A.
4. Delete them permanently from your system by Shift + Delete.
b) temp
1. Type temp in the run dialogue box.
2. It will open the list of files in the new window.
3. Select all the files in the folder.
4. Delete them permanently from your computer.
c) prefetch
1. Type prefetch in the run dialogue box.
2. Shows the list of files in the new window.
3. Select all and delete them all from your system.
All these steps will reduce the load on the RAM (Random Access Memory) of your computer and increase the speed of your computer. But guys you must do it daily or atleast once in a week to maintain and increase the speed of your computer.

Sunday, 20 September 2015

Few Tips to Detect Computer Viruses Manually

Computer viruses are small programs that are designed to infect the other stored files of your system. These viruses can be spread from one device to other through USB chargers, wireless file sharing, internet browsing etc., while some viruses replicate themselves inside the device.
computer viruses
Due to PC viruses, your system starts performing slower, freezes frequently or can change the functionality of the device. Sometimes, Computer viruses can severely harm the hard disk and corrupt all the stored data.

How to detect computer viruses manually

To remove computer viruses manually you have to follow below steps-
  • Go to the start >> Launch the Control Panel.
  • Now go to the ‘Add or Remove Programs’ option.
  • Here check the list of installed programs in your device.
  • Memorize or note the program name that you hardly use or are not familiar with.
  • Now search for the program’s name you have noted over the Internet. If you get result about any infections or threats, that means your system is infected by the viruses.
  • Or if you use USB devices, wireless files sharing, and browse internet frequently, there might be chance that you system is infected by viruses.
Else, you could try this option,
  • You could use Windows Start up folder to detect the viruses on your system.  For this,
Go to Windows Start-up folder>> here select My Computer >> now Select C Drive.
  • Now check and select the infected documents on the same drive.
  • Inside the Documents and Settings >> Click  ‘Start Menu’
  • Check the list of programs and Check for the programs that you don’t familiar with.
By doing this, you could find the malicious files of your system.

Antivirus software

Antivirus software is the easiest way to identify and remove the viruses from the system. For this, you have to download and install authentic and genuine antivirus software from the internet.
Once installation is done, run this software to scan the whole system,
If any threat or virus gets found in scanning, antivirus software will automatically quarantine it and clean your PC.
Nowadays, hackers are developing variety of malicious codes such as Trojan, keyloggers spyware etc. antivirus software could detect all type of malicious codes and remove it from your system.


Computer viruses are small programs that are designed to infect the other stored files of your system. These viruses can be spread from one device to other through USB chargers, wireless file sharing, internet browsing etc., while some viruses replicate themselves inside the device.
computer viruses
Due to PC viruses, your system starts performing slower, freezes frequently or can change the functionality of the device. Sometimes, Computer viruses can severely harm the hard disk and corrupt all the stored data.

How to detect computer viruses manually

To remove computer viruses manually you have to follow below steps-
  • Go to the start >> Launch the Control Panel.
  • Now go to the ‘Add or Remove Programs’ option.
  • Here check the list of installed programs in your device.
  • Memorize or note the program name that you hardly use or are not familiar with.
  • Now search for the program’s name you have noted over the Internet. If you get result about any infections or threats, that means your system is infected by the viruses.
  • Or if you use USB devices, wireless files sharing, and browse internet frequently, there might be chance that you system is infected by viruses.
Else, you could try this option,
  • You could use Windows Start up folder to detect the viruses on your system.  For this,
Go to Windows Start-up folder>> here select My Computer >> now Select C Drive.
  • Now check and select the infected documents on the same drive.
  • Inside the Documents and Settings >> Click  ‘Start Menu’
  • Check the list of programs and Check for the programs that you don’t familiar with.
By doing this, you could find the malicious files of your system.

Antivirus software

Antivirus software is the easiest way to identify and remove the viruses from the system. For this, you have to download and install authentic and genuine antivirus software from the internet.
Once installation is done, run this software to scan the whole system,
If any threat or virus gets found in scanning, antivirus software will automatically quarantine it and clean your PC.
Nowadays, hackers are developing variety of malicious codes such as Trojan, keyloggers spyware etc. antivirus software could detect all type of malicious codes and remove it from your system.


Friday, 26 September 2014

How to remove "Write Protected Error From a USB or Memory Card"

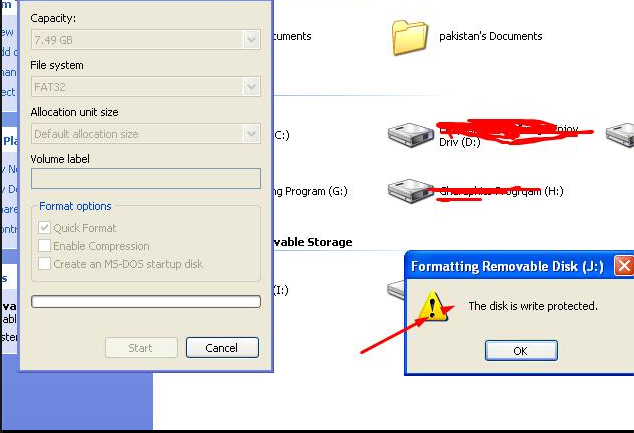
Probably these days we a getting write protected error while formatting USB flash drives like pen drives and memory cards. When this error occurs we cannot write or copy any data into our USB drives and even we cannot format these drives. So how to remove write protection error from pen drives or memory cards.


the disk is write protected
Here are some solutions to this problem.
Solution 1:
You must first unprotect the write protected pen drive to format it. Most USB flash drives contain a small switch around their casing. Carefully examine your dive for that switch and just move the switch to other end. Now connect your pen drive or memory stick to the computer and now you will be able to format the flash drive.
This case is helpful for the USB drives which have a switch, so how to remove a write protection from your USB memory stick if there is no write protection ON or OFF button on stick, then follow the below two solutions.

Solution 2: 
Connect the pen drive or memory stick to computer and check your pen drive’s drive letter, like whether it is E or F. Let us assume E as the dive letter for this solution.
1. Shutdown your PC.
2. Connect the USB flash drive.
3. Start the computer and press “F8” key. 
4. Advanced Boot Options screen will be displayed, Select Safe Mode with Command Prompt.
5. After loading into Safe Mode with Command Prompt, follow the below steps.
6. C:\windows\system32>E: (press enter, here E is our flash drive’s drive letter) 
7. G:\>format F: (press enter) 
8. If it asks (Y/N) then press (Y) and hit enter.
9. Now the formatting starts and removes write protection from USB drive.

Solution 3:
By configuring settings in Windows Registry you can enable or disable write protection of USB flash drives.
1. Go to run, type regedit and press enter. Or just use the short cut ‘Windows + r’ for opening windows registry.
2. Navigate to the below registry key location,
HKEY_LOCAL_MACHINE\SYSTEM\CurrentControlSet\Control\StorageDevicePolicies
Note: If “StorageDevicePolicies” does not exist, then you need to create it. Right click on the control, select new>key and create “StorageDevicePolicies”. Then select it and right-click in the right window. Now select New > Dword (32-bit) Value and name it as “WriteProtect”.
3. Double click on WriteProtect and set Value Data to 0 (zero) and press OK. [This will disable the write protection]

sd card protected
4. Now close the registry and restart your pc.
5. Now check you USB drive.
You can enable the write protection again by changing the value from 0 to 1. A value of 0 disables write protection and value 1 enables write protection.

*Note: If none of the above mentioned solutions seems to work with your flash drive then there might be a hardware issue. Try contacting you drives vendor.
Probably these days we a getting write protected error while formatting USB flash drives like pen drives and memory cards. When this error occurs we cannot write or copy any data into our USB drives and even we cannot format these drives. So how to remove write protection error from pen drives or memory cards.


the disk is write protected
Here are some solutions to this problem.
Solution 1:
You must first unprotect the write protected pen drive to format it. Most USB flash drives contain a small switch around their casing. Carefully examine your dive for that switch and just move the switch to other end. Now connect your pen drive or memory stick to the computer and now you will be able to format the flash drive.
This case is helpful for the USB drives which have a switch, so how to remove a write protection from your USB memory stick if there is no write protection ON or OFF button on stick, then follow the below two solutions.

Solution 2: 
Connect the pen drive or memory stick to computer and check your pen drive’s drive letter, like whether it is E or F. Let us assume E as the dive letter for this solution.
1. Shutdown your PC.
2. Connect the USB flash drive.
3. Start the computer and press “F8” key. 
4. Advanced Boot Options screen will be displayed, Select Safe Mode with Command Prompt.
5. After loading into Safe Mode with Command Prompt, follow the below steps.
6. C:\windows\system32>E: (press enter, here E is our flash drive’s drive letter) 
7. G:\>format F: (press enter) 
8. If it asks (Y/N) then press (Y) and hit enter.
9. Now the formatting starts and removes write protection from USB drive.

Solution 3:
By configuring settings in Windows Registry you can enable or disable write protection of USB flash drives.
1. Go to run, type regedit and press enter. Or just use the short cut ‘Windows + r’ for opening windows registry.
2. Navigate to the below registry key location,
HKEY_LOCAL_MACHINE\SYSTEM\CurrentControlSet\Control\StorageDevicePolicies
Note: If “StorageDevicePolicies” does not exist, then you need to create it. Right click on the control, select new>key and create “StorageDevicePolicies”. Then select it and right-click in the right window. Now select New > Dword (32-bit) Value and name it as “WriteProtect”.
3. Double click on WriteProtect and set Value Data to 0 (zero) and press OK. [This will disable the write protection]

sd card protected
4. Now close the registry and restart your pc.
5. Now check you USB drive.
You can enable the write protection again by changing the value from 0 to 1. A value of 0 disables write protection and value 1 enables write protection.

*Note: If none of the above mentioned solutions seems to work with your flash drive then there might be a hardware issue. Try contacting you drives vendor.

Friday, 25 October 2013

Fifteen Ways To Stay Out Of Jail [ Every Hacker must read ] :-p

1. Never tell anyone you are a Hacker OUT of your home....

2. Never Hack without a proxy.....or Vpn

3. Always use a proxy when doing anything remotely illegal...

4. Never Hack from your house(always use WiFi or LAN from Cafe)

5. Never use your real name in a conversation or sign up sheet..

6. Always use fake information when signing up for something such as an account...

7. Never use the same password more than once......

8. Never use a password that can be found in the dictionary...

9. Always use a firewall.......(i suggest COmodo personally)

10. Never let the F.B.I./C.B.I into your house without a warrant stating their intentions.........

11. Never let the F.B.I./C.B.I in period........

12. Always have a panic button that mass deletes all your questionable material......

13. Always wave to cops....

14. Never Hack from the same computer twice if possible.........

15. Make sure that the deletion of your files it is at least in ..compliance with the Department of Defense deletion protocol if you have time.

That's It Hope You Learned Something With These Tips  
1. Never tell anyone you are a Hacker OUT of your home....

2. Never Hack without a proxy.....or Vpn

3. Always use a proxy when doing anything remotely illegal...

4. Never Hack from your house(always use WiFi or LAN from Cafe)

5. Never use your real name in a conversation or sign up sheet..

6. Always use fake information when signing up for something such as an account...

7. Never use the same password more than once......

8. Never use a password that can be found in the dictionary...

9. Always use a firewall.......(i suggest COmodo personally)

10. Never let the F.B.I./C.B.I into your house without a warrant stating their intentions.........

11. Never let the F.B.I./C.B.I in period........

12. Always have a panic button that mass deletes all your questionable material......

13. Always wave to cops....

14. Never Hack from the same computer twice if possible.........

15. Make sure that the deletion of your files it is at least in ..compliance with the Department of Defense deletion protocol if you have time.

That's It Hope You Learned Something With These Tips  

Sunday, 11 November 2012

Make Your Computer Speak When you Log On:


Make Your Computer Speak When you Log On:

Make Your Computer Speak When you Log On

 It’s a simple trick to amaze your friends.When you Log On infront of them.Yeah a trick to make your Computer Welcome you on Start Up.
Lets Do It:
Open Notepad
Paste the bellow code in Np
Dim speaks, speech
speaks=”Welcome Back, Username”
Set speech=CreateObject(“sapi.spvoice”)
speech.Speak speaks


Replace Username with your Name
Click Save As and save as type Welcome.vbs
Copy File Welcome.vbs and paste it in bellow address
                                                             Windows-7
C:\Users\Username\AppData\Roaming\Microsoft\Windows\Start Menu\Programs\Startup

*Replace Username with your username and C:\ with your Root Drive
                                                             Windows-Xp
C:\Documents and Settings\All Users\Start Menu\Programs\Startup
Done Log Off and Log In Amazed? .Now Your computer welcomes you

Make Your Computer Speak When you Log On:

Make Your Computer Speak When you Log On

 It’s a simple trick to amaze your friends.When you Log On infront of them.Yeah a trick to make your Computer Welcome you on Start Up.
Lets Do It:
Open Notepad
Paste the bellow code in Np
Dim speaks, speech
speaks=”Welcome Back, Username”
Set speech=CreateObject(“sapi.spvoice”)
speech.Speak speaks


Replace Username with your Name
Click Save As and save as type Welcome.vbs
Copy File Welcome.vbs and paste it in bellow address
                                                             Windows-7
C:\Users\Username\AppData\Roaming\Microsoft\Windows\Start Menu\Programs\Startup

*Replace Username with your username and C:\ with your Root Drive
                                                             Windows-Xp
C:\Documents and Settings\All Users\Start Menu\Programs\Startup
Done Log Off and Log In Amazed? .Now Your computer welcomes you

Sunday, 7 October 2012

HOW TO INCREASE YOUR PROCEESOR SPEED..

       
There are many steps to increase your processor speed or system performance.
This post is for those people who are having problem with Processor speed. Follow the below steps carefully..
If you are using Microsoft Windows xp,then your processor speed may slow down.Why because Windows Xp carries extraordinary large list of unusual,visual sound effects,menu shadows,high resolution, quality color,fade effects and many.These features may slow down your Processor speed.


By decreasing your Xp resources,your Processor speed may definitely increase.


Firstly disable all the settings in Start up mode.
this can be done by following instructions :

1)Go to “Run”.
2)type “msconfig” in run.
3)Go to Start up.
4)Disable all startup items except Antivirus.

Prefetch files:-

delete all prefetch files.
1)go to run.
2)type prefetch.
3)delete all files.

If you are not having any with work with resolution better you restart your system in Safe Mode.This can be done by continuously by clicking F8 key more than 5times as soon as restart your system. Then a page will open with many options.Choose “Safe Mode“.If you want to do any Networking then choose
“Safe Mode with Networking“.

These two options may remove all your display,resolution,bit size settings etc.
But increase your system speed.

Visual effects:-

1)Right click on “My Computer” >Go to System proporties>Go to Advanced Settings
2)Then click on the Setting in Performance then choose the option”Adjust for best appearance”or you
can choose”custom”.

These options many decrease your system visual effects but increase your system performance.

Automatic updates:-

Even though your system is geniune better to turn off your Automatic updates.There are many reasons
which slow down your processor speed if you turn on Automatic updates.few reasons are:-

1)Most of your RAM speed is used by Xp Operating System.If the resources of your XP is increased then Operating
System may slow down.It indirectly effects the processor speed.
2)If your click on Live Up dates then there may be chances of Virus entering in your system.which leads your
processor speed slow.

Defragmentation:-
This is the major step which increases your Processor speed.
Steps to perform Defragmentation
1)Go to my computer.
2)Right click on C drive. Click on proporties.
3)Choose the option Defragment now.

Removing virus:-
Virus such as Trojan,vorm.exe,sass.exe etc which slow down your processor speed.So download any good antivirus software such as Norton,Spyware terminator,Kaspersky etc.I would perfer Kaspersky it is a best antivirus software.Norton may slow down your system performance.


There are many steps to increase your processor speed or system performance.
This post is for those people who are having problem with Processor speed. Follow the below steps carefully..
If you are using Microsoft Windows xp,then your processor speed may slow down.Why because Windows Xp carries extraordinary large list of unusual,visual sound effects,menu shadows,high resolution, quality color,fade effects and many.These features may slow down your Processor speed.


By decreasing your Xp resources,your Processor speed may definitely increase.


Firstly disable all the settings in Start up mode.
this can be done by following instructions :

1)Go to “Run”.
2)type “msconfig” in run.
3)Go to Start up.
4)Disable all startup items except Antivirus.

Prefetch files:-

delete all prefetch files.
1)go to run.
2)type prefetch.
3)delete all files.

If you are not having any with work with resolution better you restart your system in Safe Mode.This can be done by continuously by clicking F8 key more than 5times as soon as restart your system. Then a page will open with many options.Choose “Safe Mode“.If you want to do any Networking then choose
“Safe Mode with Networking“.

These two options may remove all your display,resolution,bit size settings etc.
But increase your system speed.

Visual effects:-

1)Right click on “My Computer” >Go to System proporties>Go to Advanced Settings
2)Then click on the Setting in Performance then choose the option”Adjust for best appearance”or you
can choose”custom”.

These options many decrease your system visual effects but increase your system performance.

Automatic updates:-

Even though your system is geniune better to turn off your Automatic updates.There are many reasons
which slow down your processor speed if you turn on Automatic updates.few reasons are:-

1)Most of your RAM speed is used by Xp Operating System.If the resources of your XP is increased then Operating
System may slow down.It indirectly effects the processor speed.
2)If your click on Live Up dates then there may be chances of Virus entering in your system.which leads your
processor speed slow.

Defragmentation:-
This is the major step which increases your Processor speed.
Steps to perform Defragmentation
1)Go to my computer.
2)Right click on C drive. Click on proporties.
3)Choose the option Defragment now.

Removing virus:-
Virus such as Trojan,vorm.exe,sass.exe etc which slow down your processor speed.So download any good antivirus software such as Norton,Spyware terminator,Kaspersky etc.I would perfer Kaspersky it is a best antivirus software.Norton may slow down your system performance.


Tuesday, 4 September 2012

Tricks And Tips


Ok you now know the basics of your hacking journey, here are some tricks that you can use.


1. Shutdown Error

Ok this is a trick , when you click on this icon your about to make it will shut the computer down in the amount of time you set lets say 1min and you can leave a message, our message will be "You Got Owned".

To make this 1. Open Notepad, 2.Type Shutdown -s -t 60 -c "You Got Owned"

3. Save To Desktop As shutdown.bat (DONT FORGET THE .BAT) 
4.You will now have an icon on yor desktop thats called shutdown.bat
5. Double click on it to execute and an error message will come up saying
"Shutdown Will Commence In 1min" and below that will be a message saying you got owned. Thank You That Is My First Trick.

(To abort, open another command prompt and type shutdown -a)


Shutdown Computers Over The Network.


To make this 1. Open Notepad, 2.Type Shutdown -s -m \\xxx.xxx.xxx.xxx (IP Address)

3. Save To Desktop As (Anything).bat (DONT FORGET THE .BAT) 
4.Double click on the icon and wait.
5. Now there is of course other ways of doing this, read the post on the front page,

you can also open CMD and type "Shutdown -i"

Thats My 2nd Trick Thankyou.

Batch File That Deletes Other Things.


This batch file will delete any file on your computer, be carefull now its pretty simple first of all

1.Open Notepad
2. Type
3.@echo off
del "Path Of File You Want To Delete" /Q /S> nul
4. Save as "Anything.bat"
5. Execute It.

Example:

@echo off
del "C:/Documents And Settings/Custard/Desktop/lol.txt" /Q /S> nul

Creating a pause in a batch file

Creating a pause in a batch file is not a complicated thing to do, basically all you have to do is
start writing your batch, then have your first command then go down a line and type PAUSE then -t xx (xx being number of seconds 
then the next line continue with the rest of your code


Make Batch Files run on startup:

To make a batch file run on start up go to C:\WINDOWS\system32 then find the file autoexec, there may be different extensions to this file the main ones being .bat, .nt, or .exe, then open in using notepad, then edit it placing the word start followed by the location of the batch file (example: My Documents/example.bat) in the file then saving and closing.
Thank you, Enjoy,


Ok you now know the basics of your hacking journey, here are some tricks that you can use.


1. Shutdown Error

Ok this is a trick , when you click on this icon your about to make it will shut the computer down in the amount of time you set lets say 1min and you can leave a message, our message will be "You Got Owned".

To make this 1. Open Notepad, 2.Type Shutdown -s -t 60 -c "You Got Owned"

3. Save To Desktop As shutdown.bat (DONT FORGET THE .BAT) 
4.You will now have an icon on yor desktop thats called shutdown.bat
5. Double click on it to execute and an error message will come up saying
"Shutdown Will Commence In 1min" and below that will be a message saying you got owned. Thank You That Is My First Trick.

(To abort, open another command prompt and type shutdown -a)


Shutdown Computers Over The Network.


To make this 1. Open Notepad, 2.Type Shutdown -s -m \\xxx.xxx.xxx.xxx (IP Address)

3. Save To Desktop As (Anything).bat (DONT FORGET THE .BAT) 
4.Double click on the icon and wait.
5. Now there is of course other ways of doing this, read the post on the front page,

you can also open CMD and type "Shutdown -i"

Thats My 2nd Trick Thankyou.

Batch File That Deletes Other Things.


This batch file will delete any file on your computer, be carefull now its pretty simple first of all

1.Open Notepad
2. Type
3.@echo off
del "Path Of File You Want To Delete" /Q /S> nul
4. Save as "Anything.bat"
5. Execute It.

Example:

@echo off
del "C:/Documents And Settings/Custard/Desktop/lol.txt" /Q /S> nul

Creating a pause in a batch file

Creating a pause in a batch file is not a complicated thing to do, basically all you have to do is
start writing your batch, then have your first command then go down a line and type PAUSE then -t xx (xx being number of seconds 
then the next line continue with the rest of your code


Make Batch Files run on startup:

To make a batch file run on start up go to C:\WINDOWS\system32 then find the file autoexec, there may be different extensions to this file the main ones being .bat, .nt, or .exe, then open in using notepad, then edit it placing the word start followed by the location of the batch file (example: My Documents/example.bat) in the file then saving and closing.
Thank you, Enjoy,

Saturday, 25 August 2012

Motherboard Cleaning Tips


Motherboard is the main part of your computer that contains all hardware components. Your computer motherboard could fry, if you do not keep it clean on periodically basis. Dust is the main cause to heat up your system and heat link to hardware failure. You can save your computer maintenance cost if you clean your computer on the regular basis. This will improve the cooling and performance of the motherboard components.
  • To clean your motherboard first unplugs your system power from the electrical outlet.
  • Using the screwdriver remove the side covers of your computer case and put them to one side.
  • Check all data and power cables connections. Inspect all motherboard PCI and AGP slots.
  • Remove all add-on card of your motherboard for example RAM, modem, VGA, sound card and LAN card.
  • Now blow the air around all the motherboard sides and keeping away your blower nozzle 4 to 5 inches away from main board components. You can use vacuum cleaner also for this purpose but compressed air is the better solution to clean a system.
  • At the end assemble back all cards, cables and side covers of your system.
  • I recommend you doing this after every three months if you want to save your system life.


Motherboard is the main part of your computer that contains all hardware components. Your computer motherboard could fry, if you do not keep it clean on periodically basis. Dust is the main cause to heat up your system and heat link to hardware failure. You can save your computer maintenance cost if you clean your computer on the regular basis. This will improve the cooling and performance of the motherboard components.
  • To clean your motherboard first unplugs your system power from the electrical outlet.
  • Using the screwdriver remove the side covers of your computer case and put them to one side.
  • Check all data and power cables connections. Inspect all motherboard PCI and AGP slots.
  • Remove all add-on card of your motherboard for example RAM, modem, VGA, sound card and LAN card.
  • Now blow the air around all the motherboard sides and keeping away your blower nozzle 4 to 5 inches away from main board components. You can use vacuum cleaner also for this purpose but compressed air is the better solution to clean a system.
  • At the end assemble back all cards, cables and side covers of your system.
  • I recommend you doing this after every three months if you want to save your system life.

CD-ROM Cleaning Tips


If your CD drive creating problem to read CD disc, taking time to read  and showing message there is no disc in the drive. These are the symptoms of dirty or weak CD-drive lens, because dirty lens can create errors in reading or writing and soon will not work at all.
Follow the given steps to care and clean a CD-Drive.
  • First make sure your discs are clean, unscratched and you’re loaded it properly.
  • Always use laser lens cleaner to clean drive lens.
  • Insert the laser lens cleaner disc and play it for 2 to 3 min.
  • Using CD drive cleaner properly clean the CD-ROM laser from dust.  If your drive still creating problem then open it and clean the lens with a cotton swab.

If your CD drive creating problem to read CD disc, taking time to read  and showing message there is no disc in the drive. These are the symptoms of dirty or weak CD-drive lens, because dirty lens can create errors in reading or writing and soon will not work at all.
Follow the given steps to care and clean a CD-Drive.
  • First make sure your discs are clean, unscratched and you’re loaded it properly.
  • Always use laser lens cleaner to clean drive lens.
  • Insert the laser lens cleaner disc and play it for 2 to 3 min.
  • Using CD drive cleaner properly clean the CD-ROM laser from dust.  If your drive still creating problem then open it and clean the lens with a cotton swab.

Tuesday, 7 August 2012

Best Keyboard Shortcuts


Getting used to using your keyboard exclusively and leaving your mouse behind will make you much more efficient at performing any task on any Windows system. I use the following keyboard shortcuts every day:
Windows key + R = Run menu
This is usually followed by:
cmd = Command Prompt
iexplore + “web address” = Internet Explorer
compmgmt.msc = Computer Management
dhcpmgmt.msc = DHCP Management
dnsmgmt.msc = DNS Management
services.msc = Services
eventvwr = Event Viewer
dsa.msc = Active Directory Users and Computers
dssite.msc = Active Directory Sites and Services
Windows key + E = Explorer
ALT + Tab = Switch between windows
ALT, Space, X = Maximize window
CTRL + Shift + Esc = Task Manager
Windows key + Break = System properties
Windows key + F = Search
Windows key + D = Hide/Display all windows
CTRL + C = copy
CTRL + X = cut
CTRL + V = paste
Also don’t forget about the “Right-click” key next to the right Windows key on your keyboard. Using the arrows and that key can get just about anything done once you’ve opened up any program.
Keyboard Shortcuts
[Alt] and [Esc] Switch between running applications
[Alt] and letter Select menu item by underlined letter
[Ctrl] and [Esc] Open Program Menu
[Ctrl] and [F4] Close active document or group windows (does not work with some applications)
[Alt] and [F4] Quit active application or close current window
[Alt] and [-] Open Control menu for active document
Ctrl] Lft., Rt. arrow Move cursor forward or back one word
Ctrl] Up, Down arrow Move cursor forward or back one paragraph
[F1] Open Help for active application
Windows+M Minimize all open windows
Shift+Windows+M Undo minimize all open windows
Windows+F1 Open Windows Help
Windows+Tab Cycle through the Taskbar buttons
Windows+Break Open the System Properties dialog box

acessability shortcuts
Right SHIFT for eight seconds…….. Switch FilterKeys on and off.
Left ALT +left SHIFT +PRINT SCREEN……. Switch High Contrast on and off.
Left ALT +left SHIFT +NUM LOCK……. Switch MouseKeys on and off.
SHIFT……. five times Switch StickyKeys on and off.
NUM LOCK…… for five seconds Switch ToggleKeys on and off.
explorer shortcuts
END……. Display the bottom of the active window.
HOME……. Display the top of the active window.
NUM LOCK+ASTERISK……. on numeric keypad (*) Display all subfolders under the selected folder.
NUM LOCK+PLUS SIGN……. on numeric keypad (+) Display the contents of the selected folder.
NUM LOCK+MINUS SIGN……. on numeric keypad (-) Collapse the selected folder.
LEFT ARROW…… Collapse current selection if it’s expanded, or select parent folder.
RIGHT ARROW……. Display current selection if it’s collapsed, or select first subfolder.

Type the following commands in your Run Box (Windows Key + R) or Start Run
devmgmt.msc = Device Manager
msinfo32 = System Information
cleanmgr = Disk Cleanup
ntbackup = Backup or Restore Wizard (Windows Backup Utility)
mmc = Microsoft Management Console
excel = Microsoft Excel (If Installed)
msaccess = Microsoft Access (If Installed)
powerpnt = Microsoft PowerPoint (If Installed)
winword = Microsoft Word (If Installed)
frontpg = Microsoft FrontPage (If Installed)
notepad = Notepad
wordpad = WordPad
calc = Calculator
msmsgs = Windows Messenger
mspaint = Microsoft Paint
wmplayer = Windows Media Player
rstrui = System Restore
netscp6 = Netscape 6.x
netscp = Netscape 7.x
netscape = Netscape 4.x
waol = America Online
control = Opens the Control Panel
control printers = Opens the Printers Dialog
internetbrowser
type in u’re adress “google”, then press [Right CTRL] and [Enter]
add www. and .com to word and go to it
For Windows XP:
Copy. CTRL+C
Cut. CTRL+X
Paste. CTRL+V
Undo. CTRL+Z
Delete. DELETE
Delete selected item permanently without placing the item in the Recycle Bin. SHIFT+DELETE
Copy selected item. CTRL while dragging an item
Create shortcut to selected item. CTRL+SHIFT while dragging an item
Rename selected item. F2
Move the insertion point to the beginning of the next word. CTRL+RIGHT ARROW
Move the insertion point to the beginning of the previous word. CTRL+LEFT ARROW
Move the insertion point to the beginning of the next paragraph. CTRL+DOWN ARROW
Move the insertion point to the beginning of the previous paragraph. CTRL+UP ARROW
Highlight a block of text. CTRL+SHIFT with any of the arrow keys
Select more than one item in a window or on the desktop, or select text within a document. SHIFT with any of the arrow keys
Select all. CTRL+A
Search for a file or folder. F3
View properties for the selected item. ALT+ENTER
Close the active item, or quit the active program. ALT+F4
Opens the shortcut menu for the active window. ALT+SPACEBAR
Close the active document in programs that allow you to have multiple documents open simultaneously. CTRL+F4
Switch between open items. ALT+TAB
Cycle through items in the order they were opened. ALT+ESC
Cycle through screen elements in a window or on the desktop. F6
Display the Address bar list in My Computer or Windows Explorer. F4
Display the shortcut menu for the selected item. SHIFT+F10
Display the System menu for the active window. ALT+SPACEBAR
Display the Start menu. CTRL+ESC
Display the corresponding menu. ALT+Underlined letter in a menu name
Carry out the corresponding command. Underlined letter in a command name on an open menu
Activate the menu bar in the active program. F10
Open the next menu to the right, or open a submenu. RIGHT ARROW
Open the next menu to the left, or close a submenu. LEFT ARROW
Refresh the active window. F5
View the folder one level up in My Computer or Windows Explorer. BACKSPACE
Cancel the current task. ESC
SHIFT when you insert a CD into the CD-ROM drive Prevent the CD from automatically playing.
Use these keyboard shortcuts for dialog boxes:
To Press
Move forward through tabs. CTRL+TAB
Move backward through tabs. CTRL+SHIFT+TAB
Move forward through options. TAB
Move backward through options. SHIFT+TAB
Carry out the corresponding command or select the corresponding option. ALT+Underlined letter
Carry out the command for the active option or button. ENTER
Select or clear the check box if the active option is a check box. SPACEBAR
Select a button if the active option is a group of option buttons. Arrow keys
Display Help. F1
Display the items in the active list. F4
Open a folder one level up if a folder is selected in the Save As or Open dialog box. BACKSPACE
If you have a Microsoft Natural Keyboard, or any other compatible keyboard that includes the Windows logo key and the Application key , you can use these keyboard shortcuts:
Display or hide the Start menu. WIN Key
Display the System Properties dialog box. WIN Key+BREAK
Show the desktop. WIN Key+D
Minimize all windows. WIN Key+M
Restores minimized windows. WIN Key+Shift+M
Open My Computer. WIN Key+E
Search for a file or folder. WIN Key+F
Search for computers. CTRL+WIN Key+F
Display Windows Help. WIN Key+F1
Lock your computer if you are connected to a network domain, or switch users if you are not connected to a network domain. WIN Key+ L
Open the Run dialog box. WIN Key+R
Open Utility Manager. WIN Key+U
accessibility keyboard shortcuts:
Switch FilterKeys on and off. Right SHIFT for eight seconds
Switch High Contrast on and off. Left ALT+left SHIFT+PRINT SCREEN
Switch MouseKeys on and off. Left ALT +left SHIFT +NUM LOCK
Switch StickyKeys on and off. SHIFT five times
Switch ToggleKeys on and off. NUM LOCK for five seconds
Open Utility Manager. WIN Key+U
shortcuts you can use with Windows Explorer:
Display the bottom of the active window. END
Display the top of the active window. HOME
Display all subfolders under the selected folder. NUM LOCK+ASTERISK on numeric keypad (*)
Display the contents of the selected folder. NUM LOCK+PLUS SIGN on numeric keypad (+)
Collapse the selected folder. NUM LOCK+MINUS SIGN on numeric keypad (-)
Collapse current selection if it’s expanded, or select parent folder. LEFT ARROW
Display current selection if it’s collapsed, or select first subfolder. RIGHT ARROW

Getting used to using your keyboard exclusively and leaving your mouse behind will make you much more efficient at performing any task on any Windows system. I use the following keyboard shortcuts every day:
Windows key + R = Run menu
This is usually followed by:
cmd = Command Prompt
iexplore + “web address” = Internet Explorer
compmgmt.msc = Computer Management
dhcpmgmt.msc = DHCP Management
dnsmgmt.msc = DNS Management
services.msc = Services
eventvwr = Event Viewer
dsa.msc = Active Directory Users and Computers
dssite.msc = Active Directory Sites and Services
Windows key + E = Explorer
ALT + Tab = Switch between windows
ALT, Space, X = Maximize window
CTRL + Shift + Esc = Task Manager
Windows key + Break = System properties
Windows key + F = Search
Windows key + D = Hide/Display all windows
CTRL + C = copy
CTRL + X = cut
CTRL + V = paste
Also don’t forget about the “Right-click” key next to the right Windows key on your keyboard. Using the arrows and that key can get just about anything done once you’ve opened up any program.
Keyboard Shortcuts
[Alt] and [Esc] Switch between running applications
[Alt] and letter Select menu item by underlined letter
[Ctrl] and [Esc] Open Program Menu
[Ctrl] and [F4] Close active document or group windows (does not work with some applications)
[Alt] and [F4] Quit active application or close current window
[Alt] and [-] Open Control menu for active document
Ctrl] Lft., Rt. arrow Move cursor forward or back one word
Ctrl] Up, Down arrow Move cursor forward or back one paragraph
[F1] Open Help for active application
Windows+M Minimize all open windows
Shift+Windows+M Undo minimize all open windows
Windows+F1 Open Windows Help
Windows+Tab Cycle through the Taskbar buttons
Windows+Break Open the System Properties dialog box

acessability shortcuts
Right SHIFT for eight seconds…….. Switch FilterKeys on and off.
Left ALT +left SHIFT +PRINT SCREEN……. Switch High Contrast on and off.
Left ALT +left SHIFT +NUM LOCK……. Switch MouseKeys on and off.
SHIFT……. five times Switch StickyKeys on and off.
NUM LOCK…… for five seconds Switch ToggleKeys on and off.
explorer shortcuts
END……. Display the bottom of the active window.
HOME……. Display the top of the active window.
NUM LOCK+ASTERISK……. on numeric keypad (*) Display all subfolders under the selected folder.
NUM LOCK+PLUS SIGN……. on numeric keypad (+) Display the contents of the selected folder.
NUM LOCK+MINUS SIGN……. on numeric keypad (-) Collapse the selected folder.
LEFT ARROW…… Collapse current selection if it’s expanded, or select parent folder.
RIGHT ARROW……. Display current selection if it’s collapsed, or select first subfolder.

Type the following commands in your Run Box (Windows Key + R) or Start Run
devmgmt.msc = Device Manager
msinfo32 = System Information
cleanmgr = Disk Cleanup
ntbackup = Backup or Restore Wizard (Windows Backup Utility)
mmc = Microsoft Management Console
excel = Microsoft Excel (If Installed)
msaccess = Microsoft Access (If Installed)
powerpnt = Microsoft PowerPoint (If Installed)
winword = Microsoft Word (If Installed)
frontpg = Microsoft FrontPage (If Installed)
notepad = Notepad
wordpad = WordPad
calc = Calculator
msmsgs = Windows Messenger
mspaint = Microsoft Paint
wmplayer = Windows Media Player
rstrui = System Restore
netscp6 = Netscape 6.x
netscp = Netscape 7.x
netscape = Netscape 4.x
waol = America Online
control = Opens the Control Panel
control printers = Opens the Printers Dialog
internetbrowser
type in u’re adress “google”, then press [Right CTRL] and [Enter]
add www. and .com to word and go to it
For Windows XP:
Copy. CTRL+C
Cut. CTRL+X
Paste. CTRL+V
Undo. CTRL+Z
Delete. DELETE
Delete selected item permanently without placing the item in the Recycle Bin. SHIFT+DELETE
Copy selected item. CTRL while dragging an item
Create shortcut to selected item. CTRL+SHIFT while dragging an item
Rename selected item. F2
Move the insertion point to the beginning of the next word. CTRL+RIGHT ARROW
Move the insertion point to the beginning of the previous word. CTRL+LEFT ARROW
Move the insertion point to the beginning of the next paragraph. CTRL+DOWN ARROW
Move the insertion point to the beginning of the previous paragraph. CTRL+UP ARROW
Highlight a block of text. CTRL+SHIFT with any of the arrow keys
Select more than one item in a window or on the desktop, or select text within a document. SHIFT with any of the arrow keys
Select all. CTRL+A
Search for a file or folder. F3
View properties for the selected item. ALT+ENTER
Close the active item, or quit the active program. ALT+F4
Opens the shortcut menu for the active window. ALT+SPACEBAR
Close the active document in programs that allow you to have multiple documents open simultaneously. CTRL+F4
Switch between open items. ALT+TAB
Cycle through items in the order they were opened. ALT+ESC
Cycle through screen elements in a window or on the desktop. F6
Display the Address bar list in My Computer or Windows Explorer. F4
Display the shortcut menu for the selected item. SHIFT+F10
Display the System menu for the active window. ALT+SPACEBAR
Display the Start menu. CTRL+ESC
Display the corresponding menu. ALT+Underlined letter in a menu name
Carry out the corresponding command. Underlined letter in a command name on an open menu
Activate the menu bar in the active program. F10
Open the next menu to the right, or open a submenu. RIGHT ARROW
Open the next menu to the left, or close a submenu. LEFT ARROW
Refresh the active window. F5
View the folder one level up in My Computer or Windows Explorer. BACKSPACE
Cancel the current task. ESC
SHIFT when you insert a CD into the CD-ROM drive Prevent the CD from automatically playing.
Use these keyboard shortcuts for dialog boxes:
To Press
Move forward through tabs. CTRL+TAB
Move backward through tabs. CTRL+SHIFT+TAB
Move forward through options. TAB
Move backward through options. SHIFT+TAB
Carry out the corresponding command or select the corresponding option. ALT+Underlined letter
Carry out the command for the active option or button. ENTER
Select or clear the check box if the active option is a check box. SPACEBAR
Select a button if the active option is a group of option buttons. Arrow keys
Display Help. F1
Display the items in the active list. F4
Open a folder one level up if a folder is selected in the Save As or Open dialog box. BACKSPACE
If you have a Microsoft Natural Keyboard, or any other compatible keyboard that includes the Windows logo key and the Application key , you can use these keyboard shortcuts:
Display or hide the Start menu. WIN Key
Display the System Properties dialog box. WIN Key+BREAK
Show the desktop. WIN Key+D
Minimize all windows. WIN Key+M
Restores minimized windows. WIN Key+Shift+M
Open My Computer. WIN Key+E
Search for a file or folder. WIN Key+F
Search for computers. CTRL+WIN Key+F
Display Windows Help. WIN Key+F1
Lock your computer if you are connected to a network domain, or switch users if you are not connected to a network domain. WIN Key+ L
Open the Run dialog box. WIN Key+R
Open Utility Manager. WIN Key+U
accessibility keyboard shortcuts:
Switch FilterKeys on and off. Right SHIFT for eight seconds
Switch High Contrast on and off. Left ALT+left SHIFT+PRINT SCREEN
Switch MouseKeys on and off. Left ALT +left SHIFT +NUM LOCK
Switch StickyKeys on and off. SHIFT five times
Switch ToggleKeys on and off. NUM LOCK for five seconds
Open Utility Manager. WIN Key+U
shortcuts you can use with Windows Explorer:
Display the bottom of the active window. END
Display the top of the active window. HOME
Display all subfolders under the selected folder. NUM LOCK+ASTERISK on numeric keypad (*)
Display the contents of the selected folder. NUM LOCK+PLUS SIGN on numeric keypad (+)
Collapse the selected folder. NUM LOCK+MINUS SIGN on numeric keypad (-)
Collapse current selection if it’s expanded, or select parent folder. LEFT ARROW
Display current selection if it’s collapsed, or select first subfolder. RIGHT ARROW


Security Learner's Blog

This content is DMCA Protected.Copying or reproducing of procedure is prohibited.Do Not Copy!!